Using Dash
The main display
This is the main meeting display. From here you can see details of current meetings, look at the day's schedule, or make a new booking. Dash's main display can be set to one of five modes.
See below the illustration for detailed information about each part of the display for each mode, and see the configuration section for how to select the display mode.
The default Dash room display gives you a clear overview of the room's current status, as well as it's overall schedule. Ideal for a device mounted outside the door.


- Current time - Dash takes the time of day from your device's clock, which can be changed in your device's settings. Dash can also display the date on the main screen.
- Meeting room name - The name of the calendar you have selected.
- Current/upcoming meetings - The current meeting name, duration, and number of participants is displayed. If there is another meeting starting in the next ten minutes, it is displayed below.
- Meeting tools (optional) - These tools allow you to check in, extend, or end a meeting early.
See optional features for more information. - Schedule display - The schedule display shows the meeting plan for the day (or days depending on your settings). It can be configured to show a list of upcoming meetings, or a calendar view of the day. Tap on a meeting to view detailed information about the meeting.
The display is colored by the meeting status (one of Free, Occupied, or Soon to be occupied). - Book/Book now (optional) - Allows you to make impromptu room bookings for up to two hours, or optionally also book meetings in the future.
See optional features for more information. - Find a room (optional) - Allows you to find a free meeting room in the building.
See optional features for more information. - Settings - Access the app settings to select a meeting room calendar, configure optional features, or customize branding. You can protect Dash's settings with an optional passcode.
- Full schedule - Tap the calendar icon to open the room's full schedule, in a separate calendar view.
- Room attributes - Optionally display the room's attributes such as capacity, available equipment, and mobility access.
Configuration
The following settings allow you to customize your Dash experience. Use them to choose the room calendar to display, activate and configure optional features, or control the branding and appearance of the room display. The settings screen can be accessed from the Configuration screen by tapping the cog icon on the main screen.
Calendar and display
Calendar and events
Display mode - Choose between five display modes for Dash:
- A room display which shows the status of a single meeting room calendar, along with a schedule view.
- A countdown display which shows the status of a single meeting room calendar, with a countdown timer showing the remaining time for the meeting.
- A dashboard display which shows the status of multiple meeting rooms at once.
- A schedule dashboard display which shows the full schedule of multiple meeting rooms at once.
- A what's on display which shows the current and upcoming meetings from multiple rooms.
See the main display section above for a visual overview of each mode
Calendar/Calendars - Select the calendar for the meeting room you would like to display (one calendar if Display mode is set to room display or countdown display, or one or more calendars if it is set to dashboard display, schedule dashboard display, or what's on). If you do not see your calendar in the list, make sure that it has been added to your device by following the instructions in Microsoft 365 Setup or Google Setup.
Some optional features (such as ending and extending meetings, and requiring user check-in) require write access to the calendar. These features will not be available if a read-only calendar is selected.
Rename calendars - Rename your calendars, if their names are not what you would like to display in Dash.
Show all-day meetings - If this option is turned on then all-day meetings will be shown on the display, and will be included when deciding if the room is free or busy.
Display only meetings accepted by the calendar - If this option is selected then only meetings that have been accepted by the meeting room's calendar will be shown. This is particularly useful in eliminating double bookings, as a second booking made in an occupied timeslot will not be shown. This feature requires your calendar to automatically reject double bookings.
Display options
Status display - When the Display mode is set to Room display, this setting controls how the meeting room and time are shown on the main display. Choose Large room name to emphasize the room name, choose Large meeting title to emphasize the current meeting and the room's status, or choose Large clock to emphasize the current time.
Show room occupancy by color - Dash can display different colors depending on the room's current availability. Different colors are shown if the room is currently free, booked, or almost booked (currently free but will be booked within the next 10 minutes).
This option allows you to choose to have the colors displayed behind the schedule view, countdown timer, or room (depending on the Display mode you have selected), in a border around the whole display, or on the background of the whole display. The colors for each state can be set in Appearance and branding.
Display meetings as - When the Display mode is set to Room display or Schedule dashboard, this setting controls how your meetings are displayed on the main screen. You have a choice of four options. A calendar view of today's meetings shows you the entire day's meetings, while also showing gaps between meetings. The other three options show a list of all current and future meetings, providing a more compact view.
Show meeting colors - If you have a custom color for a meeting in Outlook or Google Calendar, Dash will show the color in the schedule view. This feature is only supported when connected to your calendars using the Microsoft 365 enterprise application or Google Workspace service account connection methods.
Show calendar view button on main screen - Shows a small calendar icon/button near the bottom of the schedule view, or against each room if you have selected a multi-room Display mode. Tapping it brings up a calendar view of the room so that you can see the room's full schedule.
Show room attributes on main screen - Shows the room's capacity and icons for the room's attributes (such as the presence of teleconference equipment or disabled access). This option is only available when Dash is connected to your meeting room calendars using the Microsoft 365 Enterprise Application connection or Google Workspace Service Account connection. The room attributes must be set in Exchange Online or Google Workspace Admin.
Show date on main screen - Shows the current date on Dash's main screen. You can adjust the date format in the Locale settings (see below).
Dim screen after hours - If this option is selected then Dash will dim the meeting room display after hours and display a screensaver showing the meeting room name and the current time. Dash will resume when the screen is tapped. Set the start and end of your working hours, as well os the days of the week when your office is occupied. Dash will dim the display outside your selected working hours and days.
Font size - Choose the size that visual elements such as buttons and text are displayed in Dash. This setting has a larger effect on small text such as buttons and labels, and a smaller effect on larger text such as room names and headings.
Dash also respects your system font scaling, so if you would like to change the size of all text elements equally, you can change the text size in your device's system settings. You can use the system font settings and Dash's font settings at the same time for full control over the size of text in Dash.
Locale
Language - Choose the language used in Dash. The following languages are available in both the main display and settings areas of Dash:
- English
- Danish
- German
- Portuguese (Brazil)
And the following languages are available in the main display areas of Dash:
- Azerbaijani
- Czech
- Dutch
- French
- Hebrew
- Hungarian
- Italian
- Indonesian
- Japanese
- Korean
- Lithuanian
- Malay
- Norwegian
- Polish
- Romanian
- Russian
- Serbian
- Slovak
- Spanish (Latin America)
- Swedish
- Ukrainian
The default language will be chosen based on your tablet's locale settings.
If you have any questions about the languages supported, or would like to request a translation of Dash into your language, please contact us.
Time format - Choose whether to display times in a 12-hour or 24-hour format. The default time format will be chosen based on your tablet's locale settings.
Date format - The format to use for dates shown in Dash (both on the main screen and for meetings). "Auto" chooses an appropriate format based on your device's locale, and the other options display the date as indicated.
Note that the exact format of the date is influenced by your selected language, so we recommend choosing your language before selecting a date format.
Subscription
The subscription section is where you can manage your subscription to Dash Business. If you are currently subscribed, tap Manage subscription to go to the Apple App Store or Google Play Store to manage your Dash subscription. You can also upgrade or downgrade the number of devices in your subscription at any time by using the Devices slider. Dash currently supports up to 10 devices for its in-app subscriptions. If you would like to use Dash on more than 10 devices, please Contact us
On Apple devices, if you are currently subscribed to our monthly Dash Business plan and do not see your subscription in Dash, tap Restore Purchases to make sure that Dash is showing your latest subscription information.
The subscription section also allows you to register your copy of Dash if you are subscribed to our Dash Enterprise plan. To do this, tap Enterprise license (or Pairing code on Apple devices), and then enter your license key, or a pairing code obtained from our web management dashboard.
Security
Require a passcode to access settings - If selected, you will be asked to enter a 4-digit security code. This code will be required in order to access settings from the main screen.
Label meetings with - This setting controls the title displayed against each meeting on the schedule display, and in the detailed information about each meeting. The following options are available:
- Meeting title - This is the title of the meeting, as displayed in the meeting room's calendar.
- Meeting organizer - If the meeting has an organizer, then their name will be displayed (or their email address if their name is not available). Meetings with no organizer will have the title "Room booked".
- No title or organizer - All meetings will have the title "Room booked"
Display meeting details - By default, Dash will display detailed information about a meeting when it is clicked in the schedule display. This detailed information includes:
- The meeting title
- The meeting description (including information about any video calls associated with the meeting). Displaying the meeting description is optional (see below).
- A list of attendees which may include email addresses
Disabling the meeting details option will prevent this information being displayed to users of the display.
Include meeting description - By default, Dash will display the meeting description when the meeting details are displayed. Disable this to show only the meeting title and attendee information.
Enable error reporting - If Dash encounters an unexpected error, you will see an error report. Enable error reporting to allow the error report to be submitted to us so that we can fix the error on the next version of Dash. Error reports contain basic information about your device, as well as information about the error. Error reports never contain any personal information, and you will be able to review the report before submitting.
Optional features
Check-in
Require check-in - When selected, users will be required to check in to meetings when they enter the room. This can be done by tapping a check-in button on the main screen, and must be done within a configured amount of time (see below) of the meeting starting. The room will be automatically removed from meetings not checked-in after this time. The meeting will remain in the organizer's calendar, so the meeting itself will be unaffected.
Release room after - Control how long Dash will wait after the meeting's scheduled start time before removing the room from the meeting. If Don't release is selected, the meeting will be displayed as tentative on the display until the check-in button is pressed but Dash won't end the meeting if it isn't checked in.
Release room from recurring meetings after - When a recurring meeting is not checked in to multiple times in a row, you can configure Dash to remove the meeting room from all further meetings in the series. Choose Don't release leave future meetings alone, or choose the number of consecutive missed check-ins after which the room will be removed from the series.
When connected to your room calendars using the Device calendar or Microsoft 365 business/personal account connection methods, the check-in feature writes a small amount of text to the calendar event's description when the meeting is checked-in.
Booking
Allow booking - Allows users to book the meeting room (if its schedule allows). Choose between:
- Booking not allowed - When selected, users are able to book the room (if its schedule allows).
- Instant bookings only - The room may be booked immediately for 15 minutes, 30 minutes, one hour, or two hours.
- Instant and later bookings - The room may be booked immediately, and also in advance.
When booking is enabled, then the following options can be configured:
These settings apply to all bookings:
Suggested booking lengths - this setting affects the length of time suggested when the user is booking the room:
- Friendly booking end times - Booking lengths will be chosen so that your booking finishes at a round time (such as on the hour).
- Friendly booking lengths - Round booking lengths will be suggested (for example 30 minutes or 1 hour)
Include video conferencing - this setting allows you to control whether a video conference link is added to bookings made from the Dash display:
- Always - A video conference link is included with all bookings.
- Never - No video conference links are included with any bookings
- Per booking - Dash will ask the user at the time a booking is being made
Users can add attendees when booking - (only available for Microsoft 365 Enterprise Application connections and Google Workspace Service Account connections). Users can add attendees (both inside and outside your organization) when booking from the Dash display. The attendees will receive a calendar invite with a videoconferencing link.
These settings appear twice, and can be set separately for instant and later bookings:
Users can set a message when booking - When selected, users are able to set their own meeting title and description when making impromptu bookings. When set to Optional, a default meeting title is pre-entered. When set to Required there is no default title, and the user must enter a title.
Users can set the organizer when booking - (only available for Microsoft 365 Enterprise Application connections and Google Workspace Service Account connections). Users can choose a member of your organization to be the meeting's organizer. The meeting will be created in the member's calendar and the meeting room will be set as the meeting's location. When set to Optional the user can book a meeting without selecting an organizer (in which case the booking will be created in the meeting room's calendar only). If set to Required then the user must choose an organizer.
Passcode
Require a passcode to book from the display - If turned on, this setting requires users to enter a 4-digit passcode before making bookings from the display. This setting affects instant and future bookings, as well as bookings made from the find a free room feature.
Also require the passcode to end or extend meetings - If turned on, users will also need to enter the passcode to make changes to meetings, such as extending them or ending them early.
Ending and extending
Allow ending active meetings - When selected, users are able to end the current meeting directly from the main screen. It is also possible to end upcoming meetings that are starting in the next ten minutes.
When ending active meetings - There are two options for ending meetings:
- Delete the meeting - this will completely remove the meeting from the meeting room's calendar
- Change the meeting finish time - This will bring forward the meeting end time. Note that if this would cause the meeting duration to be less than one minute, it will be deleted instead.
Note that this setting does not affect the way that meetings are ended by the check-in feature (see below). Meetings ended due to not being checked in are always deleted.
Allow extending active meetings - When selected, users are able to extend the current meeting (if the room schedule allows). The meeting may be extended by 15 minutes, 30 minutes, one hour, or two hours.
Allow ending future meetings - When selected, users are able to end future meetings directly from the main screen. Just tap on a meeting in the schedule view (both on the main display, and when viewing the room's full calendar), then tap Cancel meeting
When allowing ending or extending meetings, choosing to allow "only for meetings booked from a Dash display" restricts ending or extending meetings to only meetings with no organizer, or where the organizer is the conference room.
This is usually the case for meetings booked from the Dash display but can also apply to meetings booked directly in the conference room's calendar by an admin.
Find free rooms
Find free rooms - When selected, users are able to search for other free rooms in the building, and also book them (if the Allow Booking setting is enabled).
Rooms that are either free now, or will be free in the next ten minutes are included in the list, and the rooms are ordered by the length of time available (with the longest time listed first).
Rooms to check - The list of calendars to search when checking for free rooms. You may select as many calendars as you would like.
If you do not see all your rooms in the list, make sure that they have been added to your device by following the instructions in Microsoft 365 Setup, Google Setup, or Device calendar Setup (depending on which method you are using to connect Dash to your calendars).
Appearance and branding
Appearance and branding allows you to customize the appearance of Dash to match your company branding. You can customize the colors of most elements of the user interface, as well as choose a custom background image and logo for the app.
You are able to choose custom colors for the following components:
- Background color - The background color of the main display. If you also choose a background image this color will appear behind it.
- Text color - The color of text in the main display, and also in dialogs used for booking or finding rooms.
- Button color - The color of buttons.
- Button border color - The color of the border around buttons. Set this to transparent for no border.
- Button text color - The color of the text inside buttons.
- Dialog background color - The background color of dialogs used for room booking, meeting details, and room finding.
- Room free color - The color used to indicate that the room is currently free.
- Room almost booked color - The color used to indicate that the room is currently free, but will be occupied in the next ten minutes.
- Room booked color - The color used to indicate that the room is currently occupied.
- Schedule background color - When you have set the room occupancy to be shown on a border around the display or the background of the whole display, this setting controls the background color of the schedule view.
Each of these colors can be tested in the live preview. The booking status of the preview can be changed using the toggle buttons above the main display.
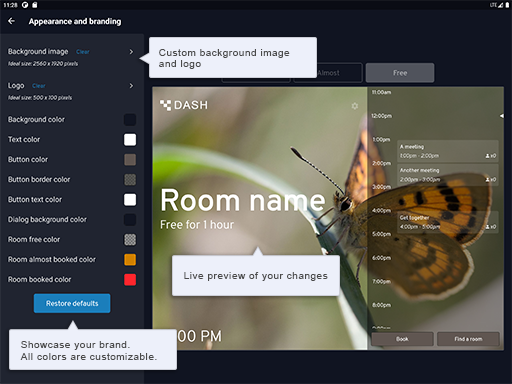
Dash allows you to set a custom background image for the display. This can contain your logo, or other company colors and imagery, and can be used to further personalize the display with your branding.
It is recommended that you use an image with the same aspect ratio as your device, but if a different aspect ratio is used then Dash will scale the image so that the view is always entirely filled.
For best results, you should create an image that exactly matches the size of your device's display in pixels. This ideal size for your device is shown underneath the Background image option.
Dash also allows you to display a custom logo. The chosen logo will appear at the top of the main screen. You can choose from three logo sizes (small, medium, and large) and the ideal image size will be displayed below the option. If you use an image with a different size, it will be scaled to fit and aligned to the left. If you would like to have your logo appear in a different part of the main display you can add it to your background image.
Booking and check-in
Book your room from the screen, find free rooms close by, and clear unused bookings automatically. Learn how to use Dash's advanced features to manage your meeting spaces. All advanced features are optional, so make sure that you have activated and configured them by following the configuration instructions above.
Booking
The booking controls can be found at the bottom right corner of the main display (for horizontal devices), or at the bottom of the display (for vertical devices). To book the room, tap the button labeled Book now.
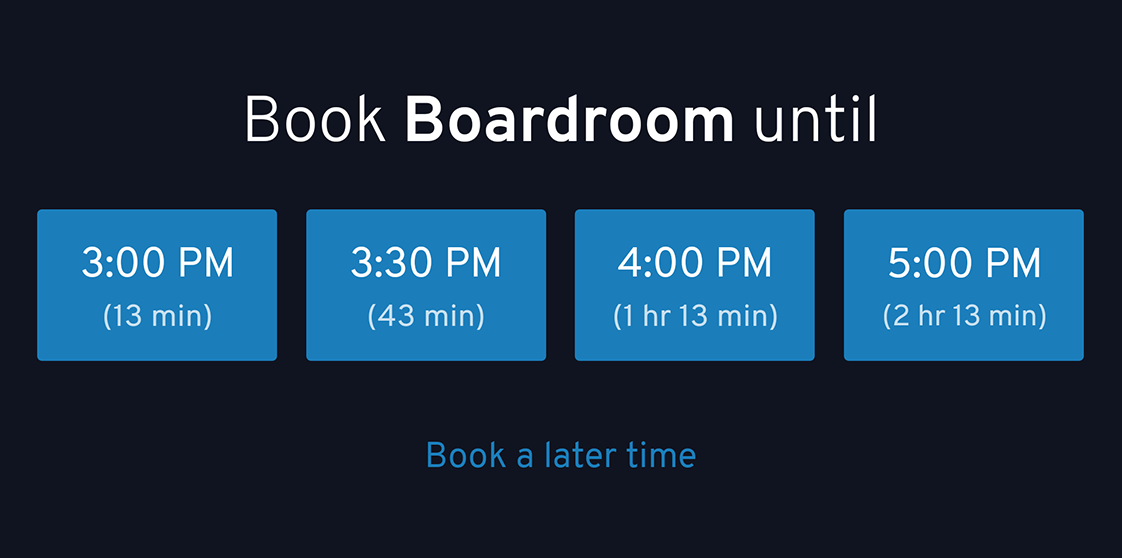
You will be presented with a booking screen showing four approximate durations: 15 minutes, 30 minutes, 1 hour, and 2 hours. Tap the length of time you would like to book, and a booking will be made with the title "Manually booked".
If you have chosen to allow booking the room in advance, there will also be a button Book a later time. Tapping this button will bring up a calendar display (showing a week on larger devices, or a day on smaller devices).
Move the calendar view backward and forward in time by pressing the arrow buttons on either side of the dates, or choose a date from the picker by tapping on the month displayed in the center of the screen. To make a booking, tap on an empty space in the schedule, and drag the booking to refine. When you're done, press the Book button at the bottom of the screen. Note that users are always able to set the title and description of advance bookings, regardless of the value set for Users can set a message when booking in Settings.
If the room is currently booked, impromptu booking will be disabled. If future booking is enabled, Dash will launch the calendar view without showing the impromptu booking screen.
Check-in
The check-in feature requires all meetings to be manually checked-in when they start. To check in a meeting, click the Check in button in the current/upcoming meetings section of the main screen.
If a meeting is not checked-in within the configured time (set in the Release room after option), the room will be automatically removed from the meeting to free the space for other uses. The meeting will remain in the organizer's calendar so that attendees in other locations can still attend.
For recurring meetings, if the Release room from recurring meetings after option is enabled, Dash will also remove the meeting room from any future occurrences once the meeting has missed the configured number of check-ins in a row.
Extending and ending meetings
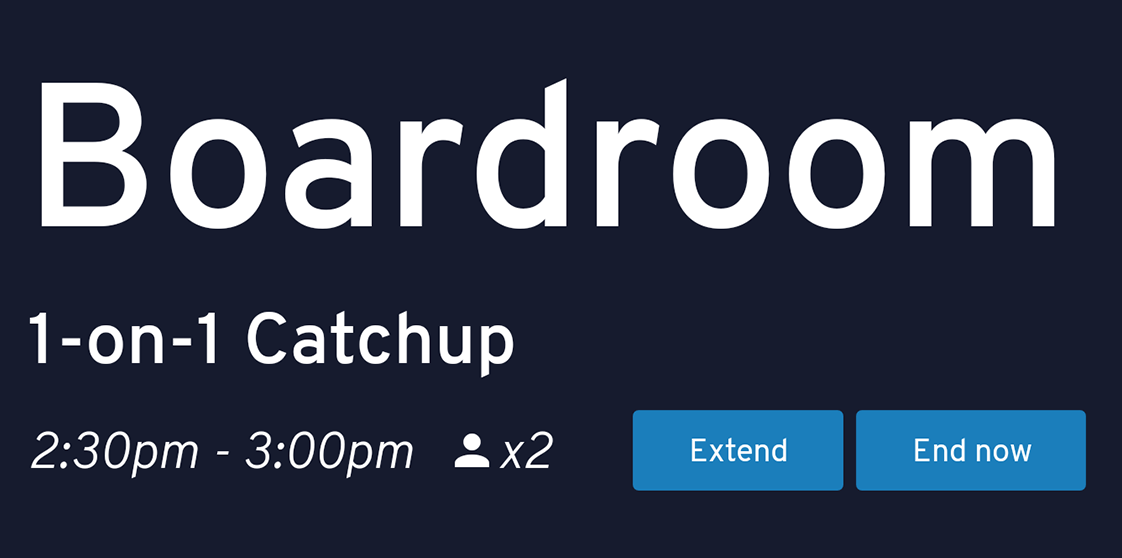
The current meeting can be extended if there is space in the room's schedule. To extend a meeting, tap the Extend button in the current/upcoming meetings section of the main screen.
You will be presented with a screen similar to the booking screen, showing four durations: 15 minutes, 30 minutes, 1 hour, and 2 hours. Tap the length of time you would like to extend, and the booking will be adjusted.
The current meeting can also be ended by tapping the End now button. The meeting will either be removed from your calendar, or edited to end at the current time, depending on the setting you chose for When ending meetings in the settings screen.
Find a room
Before using this feature, you need to select the calendars you would like to check (see the Rooms to check option in the Configuration settings described above).
The free rooms controls can be found in the bottom right corner of the main display (for horizontal devices), or at the bottom of the display (for vertical devices). To find a free room, tap the button labeled Find a room.
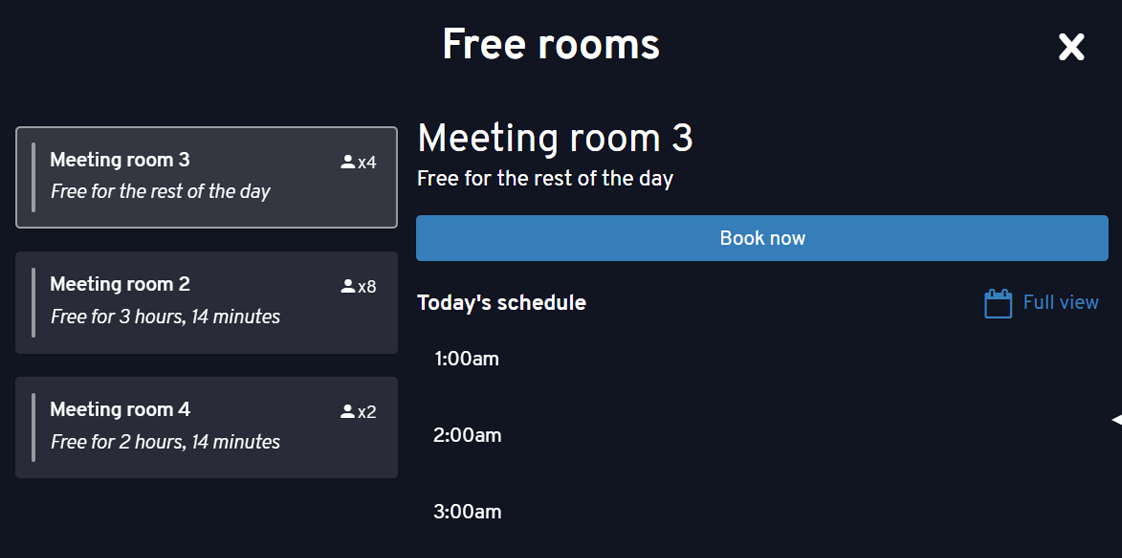
You will be presented with a booking screen showing all free rooms found. The list is ordered with the rooms having the most free time appearing first. Tap a free room to view its schedule, then tap Book now to book it for your desired amount of time.
Managing multiple rooms?
Dash Enterprise lets you configure every display from one place instead of individually on each device. Deploy and configure Dash through our web management dashboard or your MDM system of choice.
Dash Enterprise also includes detailed room analytics so you can see how your meeting spaces are used.
We offer a fully-featured free trial - contact us to try Dash Enterprise free for one month.
Learn about Dash Enterprise