Connecting Dash to a Google Workspace standard, or personal account
Connecting Dash via the method described below is recommended for small businesses, or if you'd like to connect Dash to your personal Google account. If you are a larger business then we recommend that you can connect Dash via a Service account.
Creating a Google account for Dash
Once you have set up your meeting rooms, you will need to choose a Google account from your organization to use with Dash (this can be either a new account or an existing one, for example dash@yourcompany.com). Follow the steps below to give this account access to your meeting room calendars. You'll need to do this for each meeting room calendar you'd like to use with Dash.
Open the meeting room:
Log into Google Calendar with an admin account for your organization. You should see all your resource calendars listed under My calendars.
Hover over one to see a three-dot menu appear. Click the menu and select Settings and sharing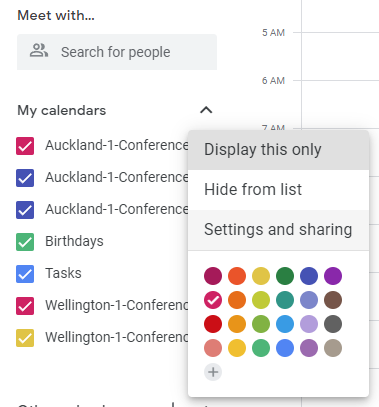
Share the room's calendar:
Scroll down until you see Share with specific people or groups and then click Add people and groups. Enter the email address of the account that you chose to use with Dash.
If you plan to book, extend, or end meetings from your Dash display, select the Make changes to events permission and click Send. If you plan to use Dash as a read-only display then you can select See all event details instead.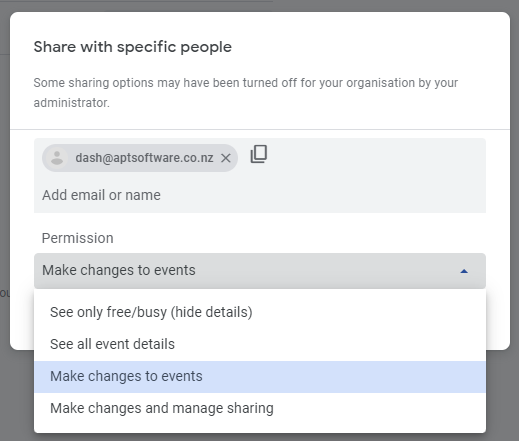
Accept the share request:
Log into Gmail with the account you created for Dash. You should see a share notification email with a subject like XXX has shared a calendar with you.
Open the email and click the Add this calendar link. This will add the meeting room to the account's list of calendars.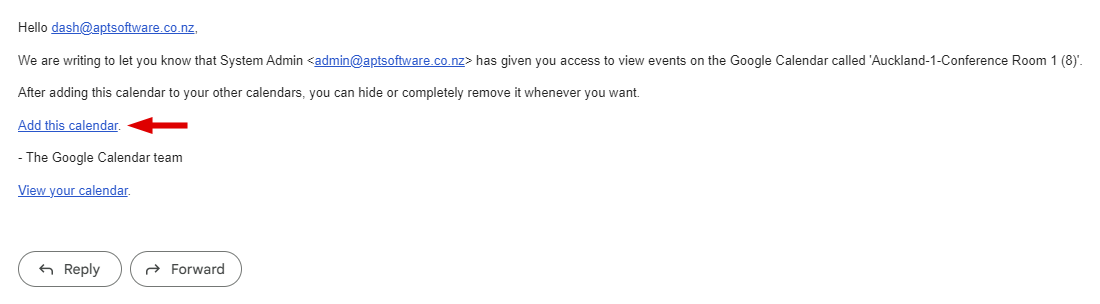


You can also use a free Gmail account instead of a Google account in your organization. By default, Google only lets you share resource calendars with the See all event details permission (which won't let you book meetings from Dash) but you can change this in the Google Workspace Admin console.
Just go to Apps > Google Workspace > Calendar > General settings > External sharing options for secondary calendars and select Share all information, and outsiders can change calendars
Connecting Dash to your Google account
Once you have set up your Google account, you can connect it to Dash. Open Dash and go to Settings (the cog icon in the bottom right of the main display). If you haven't previously connect Dash to any calendars, you'll see a Connect button, or if Dash is already connected to a calendar you'll see a Change button. Click Connect or Change.
You should see a list of calendar services to choose from (Microsoft 365, Google, and your device calendar). Select Google Workspace and you will be asked to sign in. You should then see a screen asking permission to grant Dash access to your account. Dash will request the following permissions:
- View a list of your calendars - This is necessary in order to allow you to choose the calendar(s) you want to use with Dash.
- Read and write access to your calendars - This allows Dash to read meeting information from your calendars, and also allows you to use Dash's advanced features such as booking a room from the display and automatically cancelling abandoned meetings.
Dash will not be given any further access to your Google account, and will only be able to read the information listed above. Once you have granted Dash permission to access your account, check out our Quick start guide for more information on how to get started with Dash.
Managing multiple rooms?
Dash Enterprise lets you configure every display from one place instead of individually on each device. Deploy and configure Dash through our web management dashboard or your MDM system of choice.
Dash Enterprise also includes detailed room analytics so you can see how your meeting spaces are used.
We offer a fully-featured free trial - contact us to try Dash Enterprise free for one month.
Learn about Dash Enterprise